本文最后更新于:2020年5月17日 晚上
概览 :本文是Python3.x的简易学习笔记。
基本数据类型 整数:int 8
浮点数: float 8.8
字符串: str “8个人部分股”
布尔值:bool True False
查看数据类型 1 2 type (8 ) id (8 )
类型转换 1 2 3 str --> int : int ('8' )int --> str : str(123 )int --> bool : bool (123 ) = True
序列 字符串、列表、元组三种类型都属于序列。
1 2 3 字符串: "abcd" 0 , 'abcd' ]"abc" , "def" )
列表存储的内容可变更
但是元组存储的内容不可变更
序列的基本操作 切片操作 – [0:整数] 1 2 3 chineseZodiac = "鼠牛虎兔龙蛇马羊猴鸡狗猪" 0 :4 ])
1 2 3 4 5 6 7
成员关系 – in、not in 1 2 3 print('狗' in chineseZodiac) '狗' not in chineseZodiac)
连接操作 – 序列+序列 1 print(chineseZodiac + 'abcd' )
重复操作 – 序列 * 整数 1 2 3 chineseZodiac = "猴鸡狗猪鼠牛虎兔龙蛇马羊" 3 )
序列长度 字符串、元组、列表 1 2 3 4 5 6 chineseZodiac = "鼠牛虎兔龙蛇马羊猴鸡狗猪" u'摩羯座' ,u'水瓶座' ,u'双鱼座' ,u'白羊座' ,u'金牛座' ,u'双子座' ,u'巨蟹座' ,u'狮子座' ,u'处女座' ,u'天秤座' ,u'天蝎座' ,u'射手座' ) 'abc' , 'xyz' ]
列表推导式 1 2 3 4 5 6 7 8 9 10 11 for i in range (1 ,11 ):if (i%2 == 0 ):for i in range (1 ,11 ) if (i%2 == 0 )]
字符串的一些操作 1 2 3 split('|' ) -- 将字符串按照符号“|”来进行分割成为一个列表'\n' ) -- 将字符串里的换行符剔除'a' ,'b' ) -- 将字符串里的字母'a' 全都替换成为字母'b'
字典 字典是无序的可变序列。保存的内容是以“键值对”的形式存放的。
类似于C++中的map。
特征:
字典中的键值必须唯一,且不能够改变。所以列表不能作为字典的键。
字典是通过键值来读取的,字典也称为散列表(hash)。不能向序列那样通过索引获取值。
字典是无序集合,各项随机排列,这样能够提高查找的效率。
1 2 3 4 5 6 7 8 9 10 11 12 13 14 15 16 17 18 19 20 21 22 23 24 dict1 = {'x' :1 , "y" :2 }type (dict1)) 'z' ] = 3 for each_key in dict1.keys():":" + str (dict1[each_key]))for item in dict1.items():
字典推导式 1 2 3 4 5 6 7 8 'x' :1 , 'y' :1 , 'z' :1 }'xyz' 1 for i in str1}
流程控制 条件语句 1 2 3 4 5 6 7 8 9 10 chineseZodiac = "猴鸡狗猪鼠牛虎兔龙蛇马羊" int (input ('请用户输入年份:' ))if chineseZodiac[year%12 ] == '狗' :"狗年发大财" )elif chineseZodiac[year%12 ] == '猪' :"猪年快乐" )else :"笑口常开" )
for循环 1 2 3 4 5 6 7 8 9 10 chineseZodiac = "猴鸡狗猪鼠牛虎兔龙蛇马羊" for i in chineseZodiac:for i in range (13 ):for year in range (2000 ,2020 ):"%s 年的生肖是 %s" %(year,chineseZodiac[year%12 ]))
while循环 1 2 3 4 5 6 7 8 9 10 11 12 13 14 15 16 17 18 19 20 21 22 23 while True :'a' )break 5 while True :1 if num > 10 :break 5 while True :1 if num == 10 :continue if num > 15 :break ;
👍元组中的filter 1 2 3 4 5 6 7 8 zodiac_name = (u'摩羯座' ,u'水瓶座' ,u'双鱼座' ,u'白羊座' ,u'金牛座' ,u'双子座' ,u'巨蟹座' ,u'狮子座' ,u'处女座' ,u'天秤座' ,u'天蝎座' ,u'射手座' )1 ,20 ),(2 ,19 ),(3 ,21 ),(4 ,21 ),(5 ,23 ),(6 ,22 ),7 ,23 ),(8 ,23 ),(9 ,23 ),(10 ,23 ),(11 ,23 ),(12 ,23 ))2 ,11 )filter (lambda x: x<=(month,day), zodiac_day)len ( list (zodiac) ) 12 ])
1 2 3 4 5 6 7 8 9 10 11 12 13 14 15 zodiac_name = (u'摩羯座' ,u'水瓶座' ,u'双鱼座' ,u'白羊座' ,u'金牛座' ,u'双子座' ,u'巨蟹座' ,u'狮子座' ,u'处女座' ,u'天秤座' ,u'天蝎座' ,u'射手座' )1 ,20 ),(2 ,19 ),(3 ,21 ),(4 ,21 ),(5 ,23 ),(6 ,22 ),7 ,23 ),(8 ,23 ),(9 ,23 ),(10 ,23 ),(11 ,23 ),(12 ,23 ))int (input ("请输入月份:" ))int (input ("请输入日期:" ))for zo in range (len (zodiac_day)):if (month,day) <= zodiac_day[zo]:"出生于%s月%s日的星座是%s" %(month,day,zodiac_name[zo]))break elif month == 12 and day > 23 :"出生于%s月%s日的星座是摩羯座" % (month, day))break
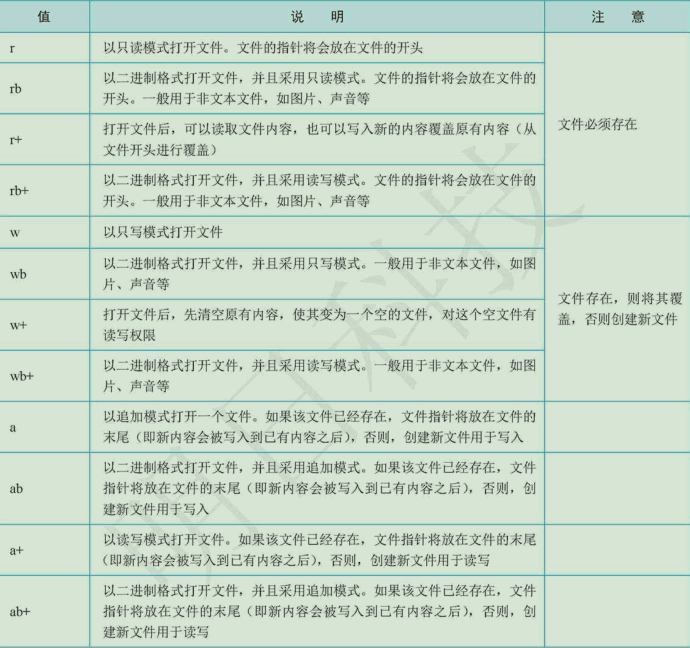
文件读取 1 2 3 4 5 6 7 8 9 10 11 12 13 14 15 16 17 18 19 20 21 22 23 24 25 26 27 28 29 30 31 32 33 34 35 36 37 38 39 40 41 open ('name.txt' ,'w' )"hello,Python" )open ("name.txt" ,'r' )str = file2.readline()str )open ("name.txt" ,"a" )"你好/n哈哈" )open ("name.txt" , 'r' )for line in file4.readlines():"===" )open ("name.txt" ,'r' )1 )) 0 ) open ("name.txt" ,'r' )5 ,0 )
文件打开的三个参数 1 file = open ("test.txt" ,'r' ,encoding='utf-8' )
打开文件使用with语句–上下文管理器 1 2 3 with open ("name.txt" ,'r' ) as file:for line in file.readlines():
Python打开文件要及时关闭,忘记关闭可能会带来问题,另外如果在打开文件是出现了异常,那么将导致文件不能及时被关闭,为了避免此类问题,可以使用上述的with语句进行操作。
这样在处理文件时,无论是否抛出了异常,都能保证with语句执行完毕后关闭已经打开的文件 。
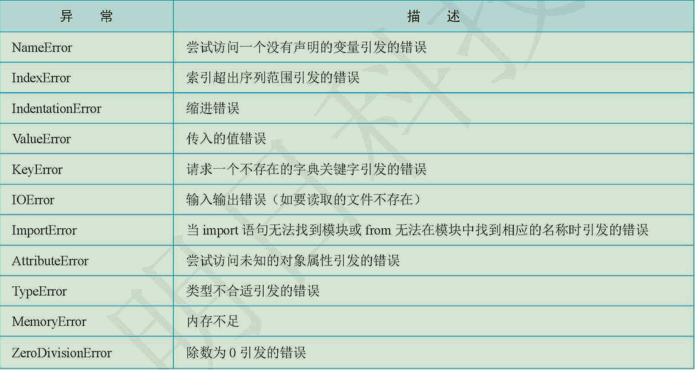
异常 常见异常
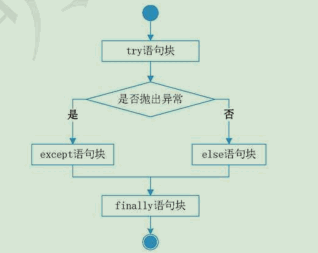
简单的异常处理语句 1 2 3 4 5 6 7 8 9 10 11 12 13 14 15 16 17 18 19 20 21 22 23 24 25 26 27 28 29 try :int (input ("请输入年份:" ))except ValueError:"年份应该输入数字" )123 try :'a' )except AttributeError:'数字没有append方法' )try :1 /0 )except ZeroDivisionError as e:'0不能作为除数:' ,e) try :1 /'a' )except Exception as e:try :1 /1 )except Exception as e:else :"正常执行" )
try…except…finally语句 finally语句用来放置无论是否发生异常都会被执行的代码。例如:打开文件是使用此语句,释放资源的代码放在finally语句之中。
使用raise语句抛出异常 1 2 3 4 5 6 7 8 9 10 11 12 13 14 15 def div ():int (input ('请输入被除数:' ))int (input ('请输入除数:' ))if num2 == 0 :raise ValueError("除数不能为0." )if __name__ == "__main__" :try :except ZeroDivisionError:"\nerror!除数不能为0" )except ValueError as e:"输入错误:" ,e)
如果某个函数或者方法可能会产生异常,但不想在当前函数或方法中处理这个异常,则可以使用raise语句在函数或者方法中抛出异常。
assert断言语句 1 2 3 4 5 6 7 8 9 10 11 12 def div ():int (input ('请输入被除数:' ))int (input ('请输入除数:' ))assert num2 != 0 , "除数不能为0" if __name__ == "__main__" :try :except AssertionError as e:"\nerror!" ,e)
断言语句的基本格式为
1 2 3 4 assert expression , reasonTrue 时什么都不做,为False 时抛出AssertionError异常。
函数 1 2 3 4 5 6 7 8 9 10 11 12 13 14 15 16 17 18 19 20 import re def find_word (word ):with open ('Stone.txt' ,encoding='GBK' ) as f:'\n' ,'' )return len (words)with open ("name.txt" ) as f:'|' )for w in words:"'" ,w,"'" ,'出现了:' ,find_word(w))
定义函数 1 2 def function (形参列表) :
如上所示,使用def来定义一个函数,如果函数有返回值的时候可以通过return语句返回。如若想定义一个空函数的画,可以使用pass作为占位符。
当函数中没有return语句时,或者省略了return语句后面的内容,将会返回None,即返回空值 。
参数传递 Python参数传递分为值传递和引用传递两种。
当实参是不可变对象 时,进行的是值传递 。
当实参为可变对象 是,进行的是引用传递 。
区别在于:
值传递 在函数内改变了形参的值,实参的值也不变 。
而引用传递 后,改变形参的值,实参的值也会一同改变 。
字符串就是不可变对象,而列表就是可变对象。
参数种类
位置参数 ,也叫必备参数。即使用函数时要按照形参列表的正确顺序与数量进行使用。关键字参数 。使用形参的名字来确定输入的参数值。打开文件时指定编码就是使用关键字参数:open('test.txt',encoding='GBK')有默认值的参数 。在定义函数时直接指定形参的默认值。这样没有参数传递时就会直接使用默认值。
例如定义函数 def func(filename, lenth = 5)
定义函数时指定的默认参数要写在所有形参的最后面 。
可以使用 函数名.__defaults__ 的形式查看函数的默认值参数,结果是元组。
此外当使用可变参数作为函数参数默认值时,多次调用可能会导致意外,所以最好将可变参数的默认值设置为None,默认参数必须要指向不可变对象 。
可变参数 。即不定长参数,可以传递的值是0个或者任意个。
第一种形式:***parameter**。接受任意多的参数并放到一个元组之中。如果若要把一个存在的列表作为参数传递进去,可以使用 *列表名称 作为参数传递。
第二种形式:**parameter。接受任意多个显式赋值 的实际参数,并将其放到字典 中。如果若要把一个存在的字典作为参数传递进去,可以使用 **字典名称 作为参数传递。
变量作用域 1 2 3 4 5 6 7 8 9 10 11 12 13 14 15 16 17 18 19 20 21 22 23 24 25 26 27 28 29 sum = 123 def func ():sum )sum ) sum = 123 def func ():sum = 456 sum )sum ) sum = 123 def func ():global sum sum = 456 sum )sum )
👍迭代器、生成器与iter函数 1 2 3 4 5 6 7 8 9 10 11 12 13 14 15 list1 = [1 ,2 ,3 ]iter (list1)next (it))next (it))next (it))def frange (start,stop,step ):while x < stop:yield xfor i in frange(10 ,20 ,0.5 ):
Python:迭代器、生成器(yield)、iter函数
只要函数里有 __iter__ 以及 __next__ 的这种方法就可以使用 for...in... 的形式以及 next 形式去取迭代值。
匿名函数–lambda表达式 1 2 3 4 5 6 7 8 9 10 11 def true ():return True lambda : True def add (x,y ):return x+ylambda x,y : x+y
: 之前写函数的参数,冒号之后写实现具体功能的表达式。此外一定要有一个变量去接受或者去调用这个lambda表达式。
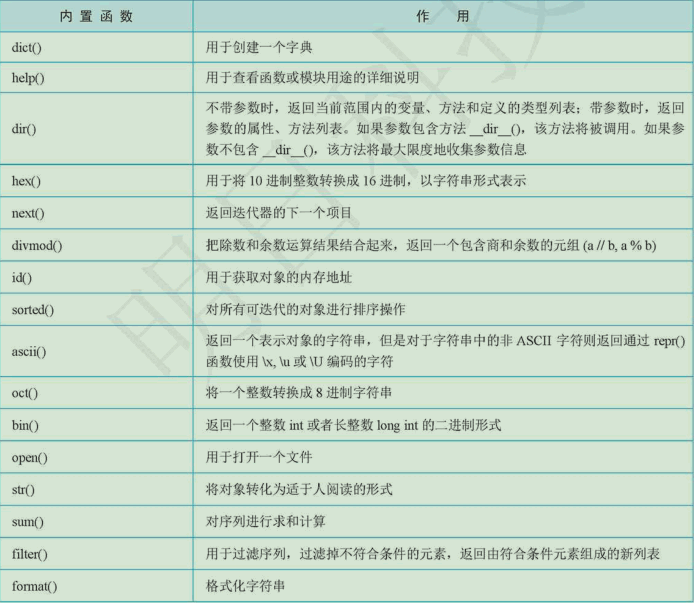
常用的Python内置函数
1 2 3 4 5 6 7 8 9 10 11 12 13 14 15 16 17 18 19 20 21 22 23 24 25 26 27 28 29 30 a = [1 ,2 ,3 ,4 ,5 ,6 ,7 ]list (filter (lambda x:x>2 , a))1 ,2 ,3 ,4 ,5 ,6 ,7 ]list (map (lambda x:x+1 , a))7 ,7 ,7 ,7 ,7 ,7 ,7 ]list (map (lambda x,y:x+y, a,b))from functools import reducelambda x,y:x+y,[1 ,2 ,3 ,4 ])) 1 ,2 ,3 )4 ,5 ,6 )for i in zip (a,b):'a' :22 , 'b' :33 }dict (zip (dict1.values(), dict1.keys()))
闭包 1 2 3 4 5 6 7 8 9 10 11 12 13 14 def func ():def printa ():"start" )return printatype (func()))
闭包是由函数及其相关的引用环境组合而成的实体。
1 2 3 4 5 6 7 8 9 10 11 12 13 14 def ExFunc (n ):sum = ndef InsFunc ():return sum +1 return addFun10 )100 )
当调用函数分别传入不同的参数的时候,得到的结果myFun1与myFun2这两个是隔离的 ,也就是说每次调用ExFunc()函数后都将生成并且保存一个新的局部变量sum。
按照命令式语言的规则,ExFunc函数只是返回了内嵌函数InsFunc的地址,在执行InsFunc函数时将会由于在其作用域内找不到sum变量而出 错。而在函数式语言中,当内嵌函数体内引用到体外的变量时,将会把定义时涉及到的引用环境和函数体打包成一个整体(闭包)返回。现在给出引用环境的定义就 容易理解了:引用环境是指在程序执行中的某个点所有处于活跃状态的约束(一个变量的名字和其所代表的对象之间的联系)所组成的集合。闭包的使用和正常的函 数调用没有区别。
由于闭包把函数和运行时的引用环境打包成为一个新的整体 ,所以就解决了函数编程中的嵌套所引发的问题。如上述代码段中,当每次调用ExFunc函数 时都将返回一个新的闭包实例 ,这些实例之间是隔离的,分别包含调用时不同的引用环境现场。不同于函数,闭包在运行时可以有多个实例,不同的引用环境和相同 的函数组合可以产生不同的实例。
闭包=函数块+定义函数时的环境
引用自博客:Python-闭包详解
并且一个常见的闭包错误以及python对应的解决方式:python nonloacal
闭包的实际小案例 1 2 3 4 5 6 7 8 9 10 11 12 13 14 15 def counter ():0 ]def add_one ():0 ] += 1 return cnt[0 ]return add_one
1 2 3 4 5 6 7 8 9 10 11 12 13 14 15 16 17 18 19 20 21 22 23 24 def yyy (a,b,x ):return a*x+b1 ,2 ,5 )1 ,2 ,6 )def yyy (a,b ):def argy (x ):return a*x + breturn argy1 ,2 )5 )6 )
如上所示,对于计算一阶函数时,想要固定a,b的值而只改变x的值的时候就可以采用这种方式,简化代码。
装饰器 1 2 3 4 5 6 7 8 9 10 11 12 import timedef iSleep ():2 )'使用时间:' ,end_time-start_time)
1 2 3 4 5 6 7 8 9 10 11 12 13 14 15 16 17 import timedef timmer (func ):def wrapper ():'使用时间:' , end_time - start_time)return wrapper@timmer def iSleep ():2 )
我们注意到装饰器可以使用def来定义,装饰器接收一个函数对象作为参数,并返回一个新的函数对象。装饰器通过名称绑定,让同一个变量名指向一个新返回的函数对象,这样就达到修改函数对象的目的。在使用装饰器时,我们通常会在新函数内部调用旧函数,以保留旧函数的功能,这正是“装饰”一词的由来。在定义好装饰器以后,就可以使用@语法了,其实际意义时,将被修饰对象作为参数传递给装饰器函数,然后将装饰器函数返回的函数对象赋给原来的被修饰对象。装饰器可以实现代码的可复用性,即我们可以用同一个装饰器修饰多个函数,以便实现相同的附加功能。
参看链接:深入浅出理解Python装饰器
1 2 3 4 5 6 7 8 9 10 11 12 13 14 15 16 17 18 19 20 21 22 23 24 25 26 27 28 29 30 31 32 33 34 35 36 37 38 39 40 41 def tips (func ):def nei (a,b ):'start' )'end' )return nei@tips def add (a,b ):@tips def sub (a,b ):1 ,2 )5 ,3 )def new_tips (argv ):def tips (func ):def nei (a,b ):'start:' ,argv)'end:' ,argv)return neireturn tips@new_tips('add' def add (a,b ):@new_tips('sub' def sub (a,b ):1 ,2 )5 ,3 )
类与对象 Python中一切都是对象,甚至字符串、函数等都是对象。
1 2 3 4 5 6 7 8 9 10 11 12 13 14 15 class Player :def __init__ (self, name, hp ):def print_role (self ):':' , self.hp)'tom' , 100 )'Bob' , 200 )
__init__()方法与self参数__init__方法是构造方法,每当创建一个类的实例的时候Python就会自动执行他。
这种函数名写法用于区分Python的默认方法和普通方法。
self参数是指向实例本身的引用,用于访问类中的属性和方法,在方法调用的时候就会自动传递参数self。(类似于C++类中的this)
类中方法的第一个参数一定要是self。(self只是约定的名字,其他名字也行)
类的成员 类的成员由实例方法 和数据成员 组成。
数据成员是指类中定义的变量,即类的属性。
而类的属性根据其所在位置的不同又分为类属性 和实例属性 。
类属性 :定义在类中,定义在类的实例方法之外的属性。
类属性在类的所有实例之间共享,即所有实例化对象共用此属性。
类属性可以通过类名调用,或者通过实例名进行访问
类似于C++类中的static变量
实例属性 :定义在类的方法中的属性。
实例属性只能通过实例名进行访问。
不同实例的实例属性之间互不影响。
访问权限 Python中通过给属性或者方法的名字前面添加单下划线 、双下划线 、首尾双下划线 的方式来限制类中属性和方法的访问权限。
首尾双下划线 :表示定义特殊方法,一般是系统定义名字。比如:__init__()方法单下划线开头 :表示protected (保护)类型的成员,只允许类本身和子类访问 ,但不能使用”from modules import *”这种语句导入。比如:自定义属性 _foo双下划线开头 :表示private (私有)成员。只允许定义该方法的类本身进行访问 ,不能直接通过类的实例进行访问,但是可以通过”类的实例名._类名_xxx”的方式访问。
1 2 3 4 5 6 7 8 9 10 11 12 13 14 15 16 17 18 19 class Swan :'天鹅的脖子很长' def __init__ (self ):"__init__()" ,self._neckSwan)'直接访问' ,swan._neckSwan)class Swan :'天鹅的脖子很长' def __init__ (self ):"__init__()" ,self.__neckSwan)'直接访问' ,swan._Swan__neckSwan)
类的继承 1 2 3 4 5 6 7 8 9 10 11 12 13 14 15 16 17 18 19 20 21 22 23 24 25 26 27 class Fruit :def __init__ (self, color ):'我是水果' )def havest (self ):'水果是' , self.color, '色的' )class Orange (Fruit ):def __init__ (self ):super ().__init__('橙' )'我是Orange' )def havest (self ):'橙子是' , self.color, '色的' )
当要继承多个父类的时候,在小括号内类名用逗号分隔开
如果不指定时,默认继承于所有Python对象的基类Object
判断实例与类的关系 1 2 3 print(type (orange)) isinstance (orange, Orange)) isinstance (orange, Fruit))
@property(装饰器) 在Python中可以通过 @property(装饰器) 将一个方法转换为属性,从而实现用于计算的属性。
将方法转换为属性之后,可以直接通过方法名来访问方法,不再需要小括号()
通过 @property 转换的属性不能够直接赋值,否则会报错
1 2 3 4 5 6 7 8 9 10 11 12 13 class Rect :def __init__ (self, width, heigh ): @property def area (self ):return self.width * self.heigh640 , 480 )'面积为:' , rect.area)
@property(装饰器)创建只读但不能修改的属性 1 2 3 4 5 6 7 8 9 10 11 12 13 class TVshow :def __init__ (self, show ): @property def show (self ):return self.__show'哪吒传奇之魔童降世' )
自定义with语句 1 2 3 4 5 6 7 8 9 10 11 12 13 14 15 16 17 18 19 20 21 class Testwith :def __enter__ (self ):'开始' )def __exit__ (self, exc_type, exc_val, exc_tb ):if exc_tb is None :'正常结束' )else :'出现异常 %s' %(exc_tb))with Testwith():'测试自定义with语句' )raise Exception('手动出现异常' )
模块 1 2 3 4 5 6 7 8 9 10 11 12 #import 模块名称import time import 模块名称 as 重命名import matplotlib as mimport 方法名import time import sleep
Python日常应用比较广泛的模块
文字的处理:re
日期类型:time、datetime
数字和数学类型:math、random
文件和目录的访问:pathlib、os.path
数据压缩和归档:tarfile
通用操作系统:os、logging、argparse
多线程:threading、queue
Internet数据处理:base64、json、urllib
结构化标记处理工具:html、xml
开发工具:unitest
调试工具:timeit
软件包的发布:venv
运行服务的 __main__
正则表达式 - re 正则表达式可以用来处理符合某些规则的字符串。
函数 1 2 3 4 5 6 7 compile (pattern[, flags]) 0 ]) 0 ])
字符
↑常用元字符

↑常用限定符
### 实例代码
1 2 3 4 5 6 7 8 9 10 11 12 13 14 15 16 17 18 19 20 21 22 23 24 25 26 27 28 29 30 31 32 33 34 35 36 37 38 39 40 41 42 43 44 45 46 47 48 49 50 51 52 53 54 55 56 57 58 59 60 61 62 63 64 65 66 67 68 69 70 71 72 73 74 75 76 77 78 79 80 81 82 import recompile ('.' )'a' )) compile ('..' )'baa' )) compile ('.{3}' )'a12a' )) compile ('ca*t' )'caaaaaat' )) compile ('ca+t' )'caaaaaat' )) 'ct' )) compile ('c?t' )'caat' )) 'ctt' )) compile ('ca{4}t' )'caaaat' )) 'caaaaaat' )) compile ('ca{4,6}t' )'caaaat' )) 'caaaaaat' )) compile ('c[abc]t' )'cat' )) 'cct' )) 'cdt' )) compile (r'\d-\d-\d' )'2019-08-24' )) compile (r'(\d+)-(\d+)-(\d+)' )'2019-08-24' )) '2019-08-24' ).group()) '2019-08-24' ).group(2 )) '2019-08-24' ).groups()compile (r'(\d+)-(\d+)-(\d+)' )'aa2019-08-24nn' )) 'aa2019-08-24nn' )) '123-456-789 # 这是一串字符串' r'#.*$' , '' , phone)r'\D' , '' , p2)
参考链接
python基础(re模块(正则表达式))
python正则表达式详解
时间相关的库 1 2 3 4 5 6 7 8 9 10 11 12 13 14 import time'%Y-%m-%d %H-%M-%S' ))import datetime10 )2008 , 10 , 1 )10 )
参考链接:Python中处理日期时间库的使用方法(转载)
random库 1 2 3 4 5 6 7 8 9 10 11 12 13 14 15 16 17 18 19 20 21 22 23 24 25 26 27 28 29 30 31 32 import randomimport stringprint (random.randint(1 ,50 ))print (random.randrange(0 , 101 , 2 ))print (random.random())print (random.uniform(1 , 10 ))print (random.choice('abcdefghijklmnopqrstuvwxyz!@#$%^&*()' ))print (random.sample('zyxwvutsrqponmlkjihgfedcba' ,5 ))'' .join(random.sample(string.ascii_letters + string.digits, 8 ))print (ran_str)print ('' .join(random.sample(['z' ,'y' ,'x' ,'w' ,'v' ,'u' ,'t' ,'s' ,'r' ,'q' ,'p' ,'o' ,'n' ,'m' ,'l' ,'k' ,'j' ,'i' ,'h' ,'g' ,'f' ,'e' ,'d' ,'c' ,'b' ,'a' ], 5 )))print (random.choice(['剪刀' , '石头' , '布' ]))1 , 2 , 3 , 4 , 5 , 6 , 7 , 8 , 9 , 0 ]print (random.shuffle(items))
文件目录操作 1 2 3 4 5 6 7 8 9 10 11 12 13 14 import os'.' )) r'E:\Code\Python\test' )) r'E:\Code\Python\test' )) r'E:\Code\Python\test' )) '/tmp/a' ,r'Python\test' )) from pathlib import Path'.' )r'E:\Code\Python\test\a' )True )
机器学习库 numpy库 Numpy 用于高性能科学计算和数据分析,是常用的高级数据分析的基础包。
1 2 3 4 5 6 7 8 9 10 11 12 13 14 15 16 17 18 19 20 21 22 23 24 25 26 27 28 29 30 31 32 33 34 35 36 37 38 39 40 41 42 43 44 45 46 47 48 49 50 51 import numpy as np2 ,3 ,4 ])type (arr1)) 1.2 ,2.3 ,3.8 ])10 ) 1 ,2 ,3 ],[4 ,5 ,6 ]]10 )) 3 ,5 ))) 3 ,5 ))) 2 ,3 ,2 )) )10 )1 ]) type (np.arange(10 ))) 10 )5 :8 ]) 3 :9 ].copy()1 :4 ] = 0 1 ,2 ,3 ],[4 ,5 ,6 ],[7 ,8 ,9 ]])type (arrs2))
参考链接:
Python入门:Anaconda和Pycharm的安装和配置
pycharm如何使用anaconda中的各种包
pycharm使用Anaconda的配置环境
pandas Pandas 是一个强大的分析结构化数据的工具集;它的使用基础是Numpy(提供高性能的矩阵运算);用于数据挖掘和数据分析,同时也提供数据清洗功能.
Series :它是一种类似于一维数组的对象,是由一组数据(各种NumPy数据类型)以及一组与之相关的数据标签(即索引)组成。仅由一组数据也可产生简单的Series对象。
DataFrame 是Pandas中的一个表格型的数据结构,包含有一组有序的列,每列可以是不同的值类型(数值、字符串、布尔型等),DataFrame即有行索引也有列索引,可以被看做是由Series组成的字典。
pandas的Series 1 2 3 4 5 6 7 8 9 10 11 12 13 14 15 16 17 18 19 20 21 22 23 24 25 26 27 28 29 30 31 32 33 34 35 36 37 38 39 40 41 42 43 44 45 46 47 48 49 50 51 52 53 54 55 56 57 58 59 60 61 62 63 64 65 66 67 68 69 70 71 from pandas import Series,DataFrameimport pandas as pd4 ,5 ,6 ,-7 ])4 ,5 ,6 ,7 ],index=['d' ,'b' ,'c' ,'a' ])type (obj2)) 'c' ] = 2 'a' in obj2)'aa' :1 ,'bb' :2 ,'cc' :3 }4.5 ,5.3 ,1.2 ,-3.6 ], index= ['b' ,'c' ,'d' ,'a' ])'a' ,'b' ,'c' ,'d' ,'e' ], fill_value=0 )'blue' ,'black' ,'white' ], index=[0 ,2 ,4 ])range (6 ) , method='ffill' ))range (6 ) , method='bfill' ))from numpy import nan as NA1 ,NA,3 ])import numpy as np10 ),'a' ,'a' ,'a' ,'b' ,'b' ,'b' ,'c' ,'c' ,'d' ,'d' ],1 ,2 ,3 ,1 ,2 ,3 ,1 ,2 ,2 ,3 ]])'b' ])'b' :'c' ])
pandas的DataFram 1 2 3 4 5 6 7 8 9 10 11 12 13 14 15 16 17 18 19 20 21 22 23 24 25 26 27 28 29 30 31 32 33 34 35 36 37 38 39 40 41 42 43 44 45 46 47 48 49 50 51 52 53 54 55 56 57 58 59 60 61 62 63 64 65 66 67 68 69 70 71 72 73 'city' :['shanghai' ,'guangdong' ,'shenzhen' ,'beijing' ],'year' :[2013 ,2015 ,2017 ,2019 ],'pop' :[1.1 ,1.3 ,1.5 ,1.7 ]}type (fram)) 'year' ,'city' ,'pop' ])'city' ])'new' ] = 100 'cap' ] = (fram2.city == 'beijing' )'beijing' :{2008 :1.5 ,2009 :2.0 },'shanghai' :{2008 :2.0 ,2009 :3.6 }}from numpy import nan as NA1 ,6 ,5 ],[1 ,NA,NA],[NA,NA,NA]])'all' ))1 , how='all' ))0 , inplace=True ))
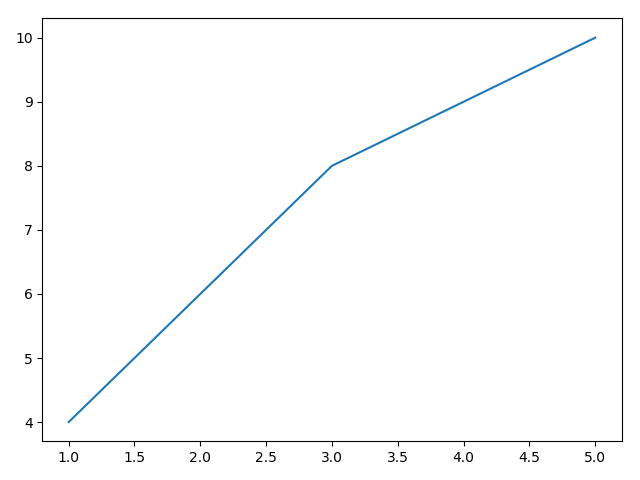
matplotlib绘图 1 2 3 4 5 6 7 8 9 import matplotlib.pyplot as pltimport warnings'ignore' )1 ,3 ,5 ],[4 ,8 ,10 ])
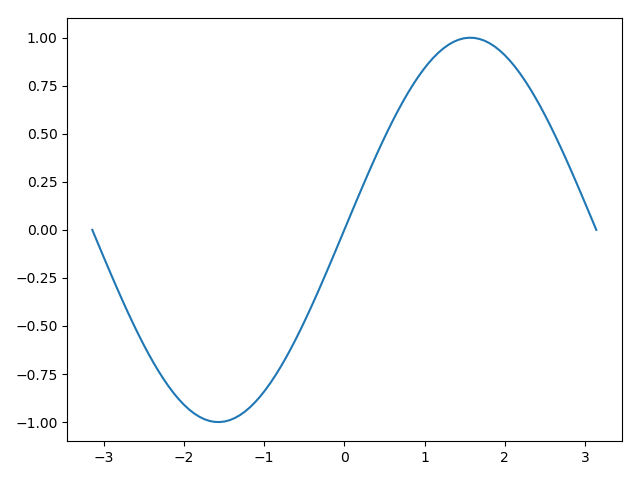
1 2 3 4 5 6 7 8 9 10 import matplotlib.pyplot as pltimport warnings'ignore' )100 )
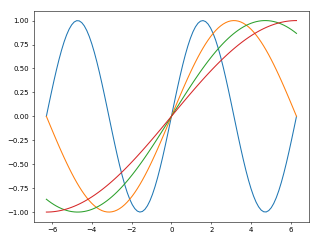
1 2 3 4 5 6 7 8 9 10 11 12 import matplotlib.pyplot as pltimport numpy as npimport warnings'ignore' )2 , np.pi * 2 , 100 )1 , dpi=50 )for i in range (1 ,5 ):
1 2 3 4 5 6 7 8 9 10 11 import matplotlib.pyplot as pltimport warnings'ignore' )1 , dpi=50 ) 1 , 2 , 1 , 2 , 3 , 5 , 1 , 3 , 6 ]
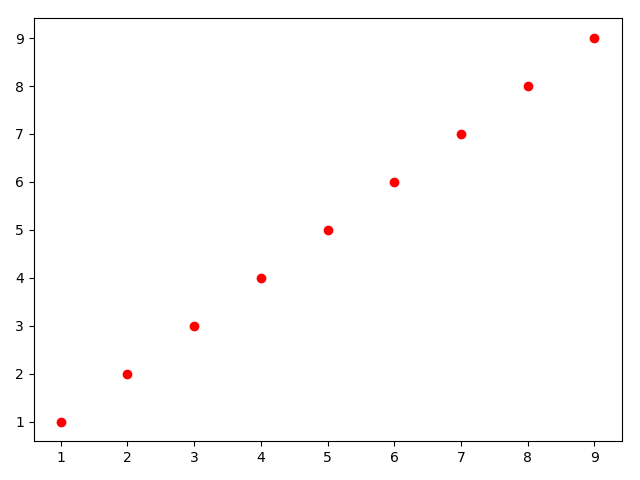
1 2 3 4 5 6 7 8 9 10 11 12 13 import matplotlib.pyplot as pltimport numpy as npimport warnings'ignore' )1 , 10 )'r' , marker='o' )
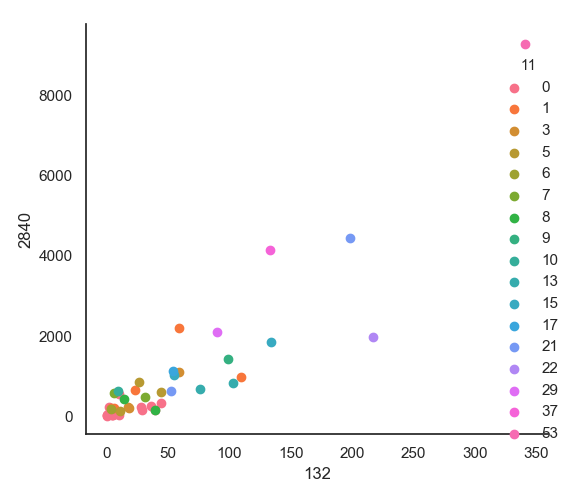
1 2 3 4 5 6 7 8 9 10 11 12 13 14 15 16 17 18 19 20 21 22 23 24 25 26 27 import matplotlib.pyplot as pltimport numpy as npimport pandas as pdimport seaborn as snsimport warnings'ignore' )'04.CSV' )'scatter' , x='132' , y='2840' )'04.CSV' )set (style='white' , color_codes=True )'132' , y='2840' , data=iris, size=5 )'132' ])
1 2 3 4 5 6 7 8 9 10 11 12 13 14 15 16 17 18 19 import matplotlib.pyplot as pltimport numpy as npimport pandas as pdimport seaborn as snsimport warnings'ignore' )'04.CSV' )set (style='white' , color_codes=True )'11' , size=5 ).map (plt.scatter, '132' , '2840' ).add_legend()